
V8 250 Toyota Gearbox installation
Eric Goes Toyota (AND GETS A NEW ENGINE)
RICHARD LONG, Model Registrar
I love my 1968 Daimler V8-250 saloon, aka Eric. Beautiful lines and engineering, along with graceful pose that manifests itself wholly when behind the wheel upon the open road. Well, that's not actually quite correct to be honest – sorry Eric !! An engine that smokes a little and leaks at various times, plus an agricultural 3-speed gearbox that uses all its available gears on reaching about 45mph. It also shares an enthusiasm, with the engine, to leak oil – not oceans but enough to be an annoying issue that detracts from the majestic presence of this lovely car. Things had to change !!

Chapter One
The decision to address the smoking engine and the Borg Warner T35 auto box, had already been established very early on after purchasing the car. I was certainly aware of the problems that these cylinder heads suffer from and I also knew that the auto box would soon be having an eviction notice served in order that something more efficient could be installed. As such my focus was cylinder heads and transmission; needless to say this focus became somewhat wider as work progressed and the unexpected unfolded !! For a while, I did consider replacing the BW unit with a 4-speed auto box, namely a ZF4 HP22 unit – in fact I had already purchased one of these units, such was my intention to use this instead. However the more I looked at doing this conversion myself, the more I decided that the amount of work required for the actual gain achieved was unbalanced and therefore I ditched that idea and sold the ZF unit. I also considered using a Volvo auto transmission and this seemed quite straight forward with decent results, but all the time I kept thinking how nice it would be for Eric to have a modern 5-speed manual gearbox. Having always driven manual classic cars, it seemed only prudent that I should keep that trend going & additionally what a lovely set-up to have: an Edward Turner 2.5L V8 engine transferring its power to a modern manual gearbox, upon which the driving experience would be further enhanced and of course the engine was certainly going to benefit via this transmission conversion.
Thus, the decision was made – cylinder heads to be rebuilt and the car converted from auto to manual; pretty straight forward really - would you not agree ?? If only !!!!
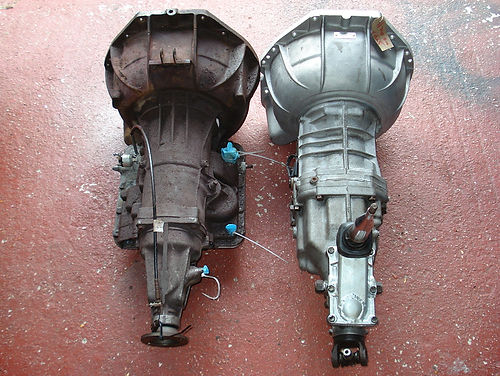
Having made numerous enquiries about manual transmissions for Eric, I decided that my preferred course would be a Toyota W58 5-speed manual gearbox. These gearboxes covered a number of vehicles from the 80's through to the late 90's. Being Toyota they are 99.9% bulletproof and have an enviable reputation for delivering “the goods” and they will easily handle 300bhp+ which is way above the standard V8-250 saloon output. Therefore, this particular gearbox is never going to be stressed and in fact, you could say it will have an active but peaceful mechanical retirement !!
The W58 gear ratios of 3.285:1, 1.894:1, 1.275:1, 1.00:1 & 0.783:1 {1st to 5th} are extremely pleasing. Coupled with the cars 4.27:1 final drive ratio, it really does provide excellent performance figures. In addition, the W58 is an all-alloy transmission making it much lighter than the BW auto unit, even with the clutch assembly added.
_JPG.jpg)
_JPG.jpg)
After quite a few weeks of searching, I located a 1991 W58 gearbox, which had been removed from a Lotus Excel that was being broken – the Excel produced less than 200bhp during its production and the gearbox was easily capable of handling that. As luck would have it, the unit was only an hours drive away and with some negotiation, the gearbox found a new home and a new car to service. I was also fortunate that the seller included the gear stick, as these are quite often sold separately which just adds to the cost and hassle of locating one. During my search for a W58, I had also been researching a couple of companies that produced a manual conversion kit specific to the V8 saloon. Of course, no one in the UK produces such a conversion kit and in fact, my enquiries led me to Australia and New Zealand. In the end, I opted for Conversion Components in NZ, a company owned by Colin Dray. He supplies all the parts required and also manufactures / casts, from scratch, a purpose-made bell housing; it is this item that really is the key factor in doing this particular conversion.
Obtaining the conversion parts proved just about adequate, I'd like to say seamless but that was not the case. Quite often my emails would not be returned regarding the order placed, funds transferred and technical information required. In the end, I purchased a “phone package” for my mobile phone so that I could contact Colin on a regular basis and keep on top of the situation – this proved to be the best conduit for communicating with him and on reflection his customer service was poor. As estimated, the conversion kit landed within three to four weeks of placing the order and it arrived safe and sound. The planning element of the project was now taking shape and looking very positive as far as the transmission was concerned. An added bonus of note was securing the correct Toyota W58 gearbox cross-member via eBay which is needed for the conversion project.
I'm pleased to say that I was able to assist a fellow East Sussex DLOC member {Mike Wells} by offering him my old BW auto box {after fixing the oil leaks !!} as his unit had been condemned.
Attention turned to the engine and I could now concentrate on all matters pertaining to that. Oops, first major hiccup alert and they do not come much bigger than the following. On removing the cylinder heads, it was noted that the LH bank had a crack on the block face adjacent to the waterways; probably due to a lack of anti-freeze at some stage. There was evidence that this crack had been the subject of a rough repair. I had no idea how old the crack was or when the repair was carried out; it mattered not because the location of the crack could not warrant a repair of any sort and nor would it have provided me with any confidence as to the blocks future longevity. In addition, there was no way of ascertaining if the symmetry of the bores had been affected and/or weakened. To confirm my suspicions, I gave Jonathan Atkin at J&E Engineering Services a call and sent some photos – his decision was immediate: the block is beyond economic repair and a replacement is required. Oh dear, I said !!! When faced with such an issue you have to be pragmatic and without a doubt, it was goodbye engine and I now needed to secure an excellent replacement.
As you can imagine this situation presents its own problems. However, it also provides a number of exciting opportunities, namely - to have a bespoke engine fully rebuilt to exacting requirements and specifications along with important modifications; things were now starting to look up again.
.jpg)
_JPG.jpg)
With my budget about to be blown, I contacted Jonathan and said “ I need you to build me a beautiful engine, please, which is a cut above anything else out there”.
“Okay” he replied !!
Chapter Two
Can you believe it. My Daimler conversion project blocked, by a cracked block- somewhat poetic, in a surreal kind of way ! !
What does one do in this sort of situation: Call International Rescue? nope a bit too dramatic or go to the next best option – put a call out to the DLOC community. It was a distress call soon answered when Graham Emmett advised me that Matthew Waterhouse probably had a spare block or two that could save the day. It so happened that this was indeed the case and Matthew was able to offer me a post-67 saloon half engine. Suddenly things were starting to look up again and Eric's "little" project was back in the green. We agreed terms and as an added bonus Matthew and Graham offered to take the engine to Jonathan at J&E Engineering Services, being only an hours drive apart. I said I'd meet them at the workshop and thus engaged on another there- and-back-in-a-day East Sussex to Lancashire journey. How I must driving !!
In addition to delivering the engine, Graham and Matthew wanted to have a tour around Jonathan's workshops - both I hasten to add were very suitably impressed; even more so by Matthew with his marque engineering background. The replacement engine was duly delivered and it certainly looked a little forlorn. It was then disclosed that the engine was actually seized - ah right, did not recall reading that in the small print !! However, that said, the engine did have some positives namely intact, good waterways, not being the subject to any previous reconditioning work and pistons marked grade A - thus the engine was a very decent candidate. Therefore despite its current disability the engine was showing initial promise, but of course all this was subject to being stripped down and the block pressure & crack tested. It is worth pointing out at this stage, that my original stripped out engine components were now with Jonathan. Once this replacement engine had been stripped, the best of all useable components from each engine could be identified. That being said, useable does not necessarily mean they are suitable.
With the replacement engine stripped, seized element issue sorted and block cleaned Jonathan was able to assess what parts could be used now and what could be kept as future spares. Anything that fell short was binned. First job was to ascertain if the block was worthy of being used - it goes without saying that the pressure & crack testing is rigorous. Only a 100% pass mark is acceptable, whereas a 99.9% pass mark just does not cut it - certainly not in Jonathan's workplace. The machine used for this testing is of an advanced nature, that being a Newclear 150; which allows for even greater accuracy compared to other types being commonly used. Most pressure testing is carried out with compressed air at room temperature, whereas this new machine allows castings to be internally hydraulically tested up to 90°C @ 8 Bar. Taking that on board, I was grateful to hear that my replacement block had passed this stringent test. Now it really was game on for an engine rebuild!!


Upon examination, the replacement block crank was in better condition than mine and required less work. This meant that my original crank would be a useful spare for someone and the replacement crank would be the one to be worked on. You may have noticed on crankshafts {certainly V8's} that many have sludge traps with a fitted plug - these are located on the side of each crank pin. During any type of lower end rebuild these plugs must be removed, to gain access to the sludge traps. What is contained inside is a thick mass of solidified oil contaminated with engine detritus - it has to be cleared out and the crank thoroughly cleaned before any further work can be contemplated. An engineering company that does not do this, is not doing a proper job and the engine rebuild becomes a pointless exercise - it really is that critical. You can see from the photos of my replacement crank, how much muck accumulates - it's an engine destroyer in the making and you can see why it needs to be addressed. Be warned though, these plugs are not easy to remove but it simply has to be done.
The replacement crank was checked for straightness, this is a principal aspect and it has to be arrow straight. Bearing journals
are measured and checked for ovality, taper and wear. Once the replacement shaft was found to be within limits it was cleaned, micro polished and the sludge trap plugs replaced.
Attention returned to the block, the next stage being a seriously deep clean by means of a process called Aqua Blasting/Vapour Honing. The machine uses fine media, high pressure water and air to achieve impressive cleaning results on ferrous and non, ferrous engine parts. Therefore it is possible wet blast cylinder heads including aluminium heads & alloy covers, valve train, crankshafts, camshafts, pistons and even cylinder blocks. Special corrosion inhibitors, in the machine, prevent flash rusting an in essence returns the component to "as new" condition without altering critical surface dimensions & finishes. I have to say throughout the engine rebuild this cleaning system was used, where appropriate, to great effect and I am glad it was available a it produces a top class finish.
With the block fully cleansed it was time to assess and decide on the re-bore size. There were a number of sound options but in the end it was decided to go +40, this came about based upon piston quality and availability. With that decided upon, the block was then re-bored, J&E Engineering Services use an interesting set-up whereby the boring head actually floats on an air cushion which allows for the most accurate centralisation in the cylinder bore. A pneumatic clamp then holds the boring head in position while machining. Once complete the boring head is simply floated over the next cylinder to be bored. This process eliminates the need for constant tool adjustments between cylinders which ensures that all cylinders are bored with the same setting therefore same size. It is these little touches that define excellent machine shop practice compared to adequate practices. With all the above going on, I shall come back to the engine rebuild progress later on.

Needless to say it was not all happening in Lancashire ! ! Back home, in East Sussex, I had some of my own conversion work to carry out, such as the pedal box, electric fan fitting and associated wiring. I was fortunate to pick up a couple of manual pedal boxes at a Jaguar Spares Day for not many pounds. On arriving at such shows, try not to buy anything from a stand located at the show door entrance - have a look around first, as the further away you get from the door the more sensible the prices become ! ! The two pedal boxes needed a bit of work but this was purely freeing up very stiff pedal arms and swapping a few worn & missing studs in the various housings. With a bit of mix 'n' match between the two manual housings, I finished with a manual pedal box in perfect working order. The other manual box has been set aside a a someday spare.
With the auto pedal box removed from the bulkhead and replacement seating gaskets cut from a sheet as these are no longer available to purchase separately, it was time to fit the new clutch master cylinder. The pedal box conversion went very well an after ensuring everything moved either freely or with the required resistance such as the pedals it was a simple case of bolting the assembly to the bulkhead. The clutch master to slave cylinder hydraulic pipe would be fitted once the engine and gearbox were fully bolted down in the car.
With the radiator removed, I took it along to Bryan & Son Radiator Repairs in Tunbridge Wells; my default rad, heater matrix and fuel tank specialist. The rad flows without issue, having had a new core not so long ago but I now needed a thermal switch boss fitted, as I wanted to fit an electric fan. In addition to the engine bay strip down, I removed the heater matrix from its housing. The car has never delivered warm air let alone hot air and on looking at the heater matrix it was obvious as to why this was the case; the matrix was clogged solid, thus another job for Bryan ! !